

Round labels can be used for striking effect everywhere from jars to boxes, invitations to direct mailers, and just about anywhere you would otherwise use a rectangular label. Designing round labels takes a little more planning than designing rectangular labels, with a few extras to watch out for. It’s one of the most common questions we receive, “how do I design on round and oval labels in Microsoft Word using blank label templates?”
In this tutorial, we’ll answer that question with easy steps anyone can accomplish in Office 365, Word 2016, Word 2013, or any version of Word from the last ten years, using either a Windows or MacOS computer.
STEP 1: Get The Template
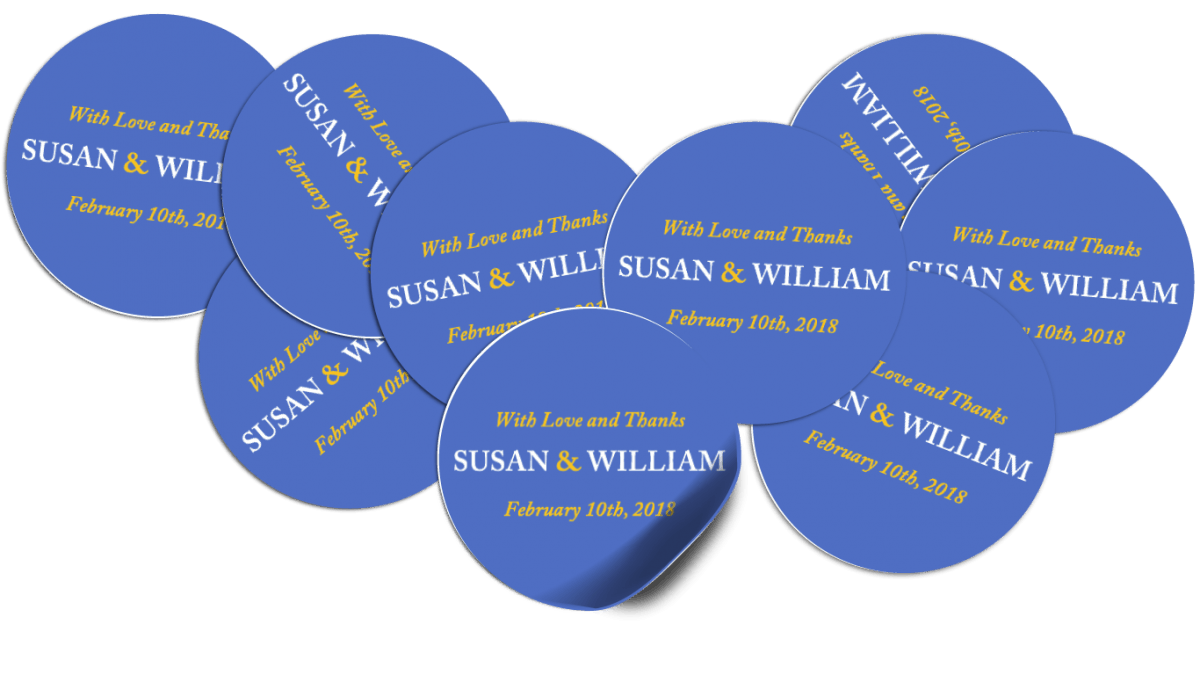
Download the correct template. We offer many different sizes of round and oval labels. For this tutorial, we’ll be using the 2.5-inch circular labels that come 12 to a sheet with labels WL-350. Download the Word template for WL-350. After downloading, open WL-350.doc in Microsoft Word.
STEP 2: Reveal the Template
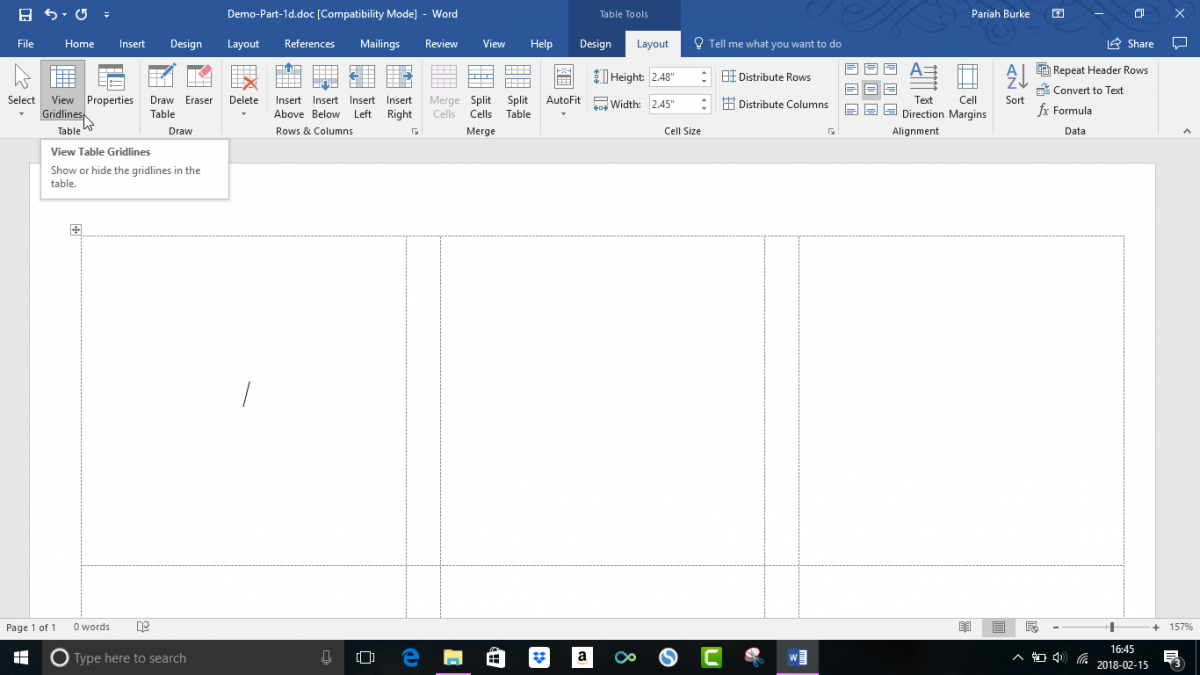
At first, the template might appear blank. Click on the “Layout” tab and then the “View Gridlines” button. That will make the template’s grid appear. The grid is a table constructed to mirror the arrangement of the round labels on a sheet of WL-250, 2.5-inch circular labels.
STEP 3: Color the Background
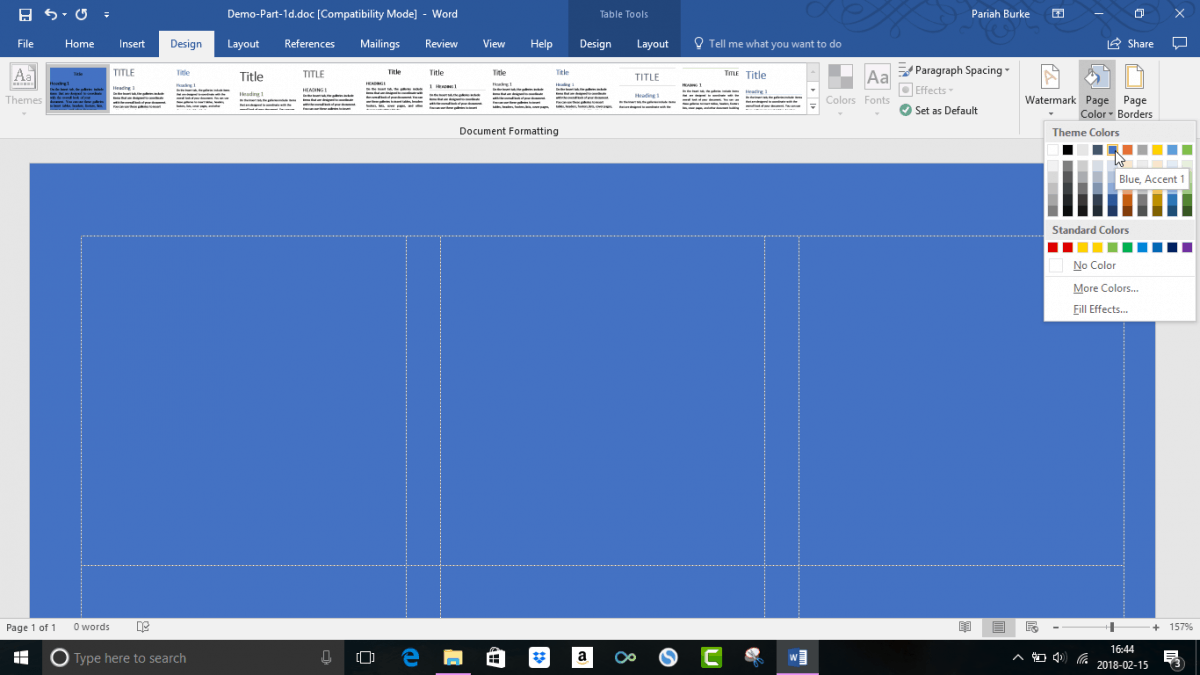
To make sure we don’t have any unsightly white edges on our circles, let’s just fill the entire page with a color. Click the “Design tab” and then the “Page Color” button to reveal a color picker dropdown. Choose the color you’d like for the background of your labels. You can choose from “Theme Colors,” “Standard Colors,” choose from any possible color by clicking “More Colors.”
We’ll select the Blue Accent 1 color swatch from the Theme Colors for this tutorial. That will color my entire page with that particular blue. When I print this sheet, my labels, and the parts of the page left behind when I peel out the round labels, will be this elegant shade of blue.
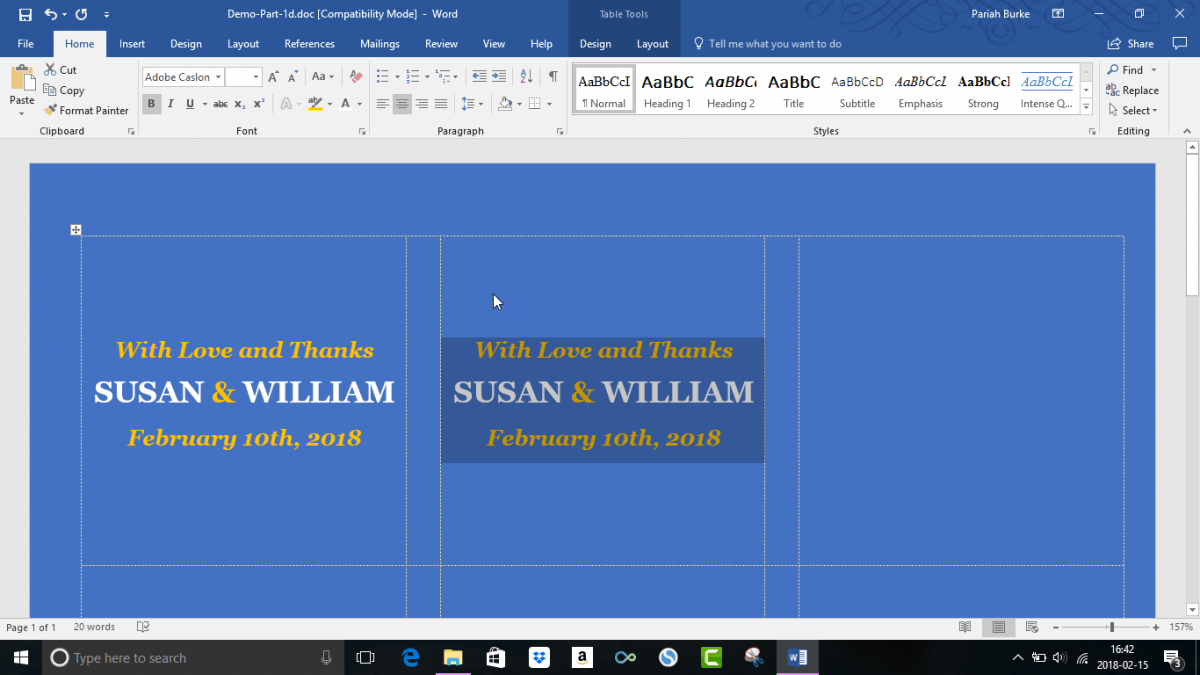
STEP 4: Design Your First Label
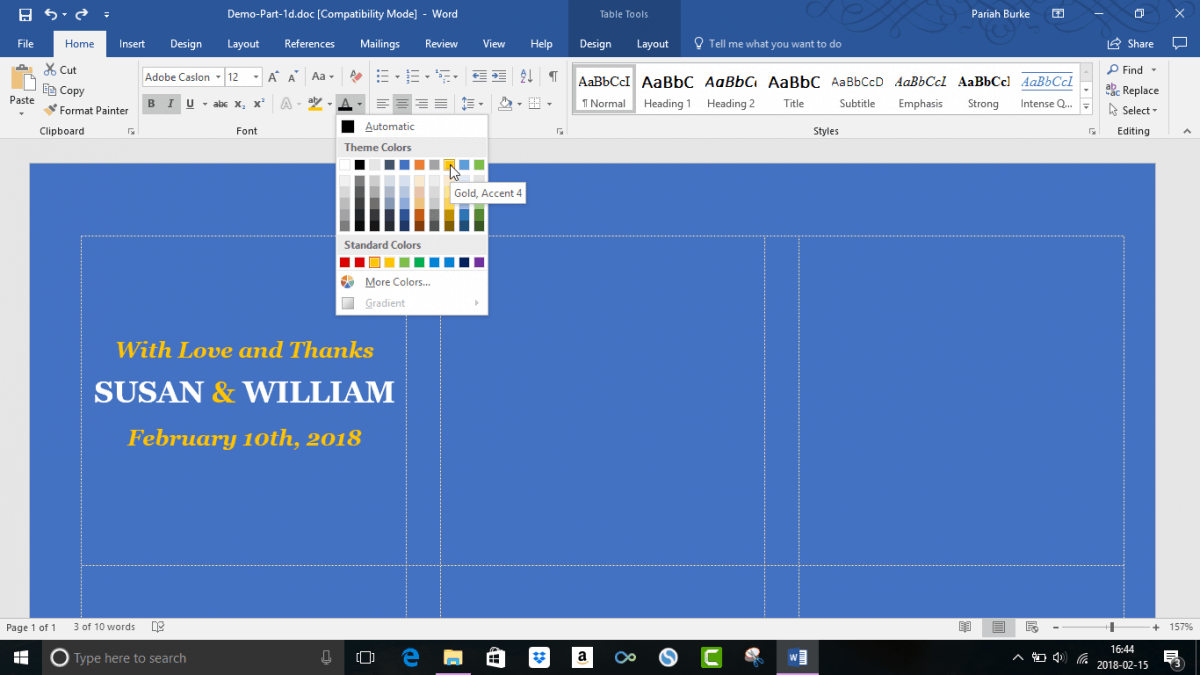
Click your cursor inside the first big table cell. Your cursor will appear in the middle left of that cell. From the “Home” tab, click the “Center” option to center the cursor horizontally. Type what you want your label to say, and then use the “Font,” “Font Size,” “Font Color,” and other fields and buttons to format your text.
Click your mouse cursor inside the first big table cell, the one on the left of the top row. Your cursor will appear in the middle left of that cell. From the Home tab of the Ribbon, click the Center Text button to center the cursor horizontally.
STEP 5: Duplicate Your Label Design
When you’re completely happy with the design of your first label, it’s time to copy and paste it into all the other label spots. Drag your mouse from the top of the label cell to the bottom to select the entire label design. Then, click “Copy” from the “Home” tab to copy your entire label to the clipboard.
Click the mouse in the second big cell in the row and paste via the “Paste” button from the “Home” tab. You should see an exact duplicate of your first label design. Repeat the paste process for each of the remaining fields. (You won’t need to copy again because you still have the design on the clipboard.) When you’re done, you should have a full sheet of identical labels.
STEP 6: Enable Background Color Printing
By default, Microsoft Word will not print page background colors. Directions for adjusting that setting differ if you’re on Windows or on Mac, so follow the instructions for your type of computer below.
On Windows
1. Click “File” on the left and then “Options.”
2. Choose “Display” from the menu.
3. In the “Printing Options” section at the bottom, click on the empty checkbox beside “Print background colors and images."
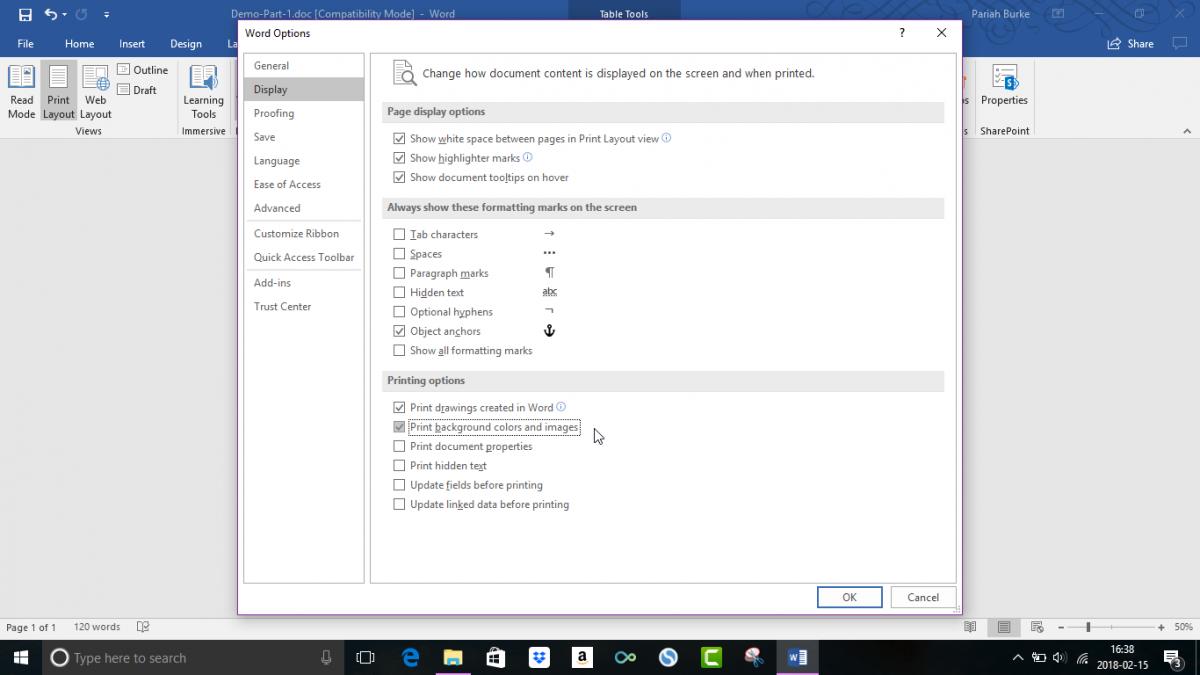
4. Click the OK button to save your changes and exit settings.
On Mac
1. Click “Word” in the Menu Bar at the very top of your screen and choose “Preferences.”
2. In the “Output and Sharing” section, click on the "Print” icon.
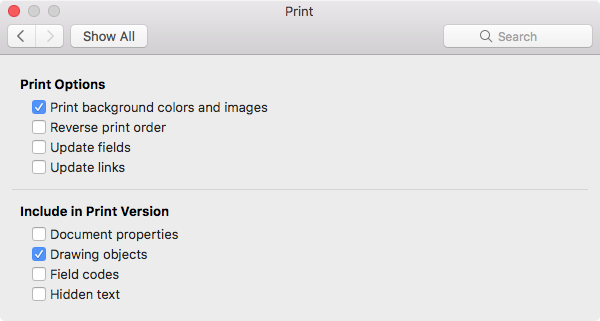
3. Click on the empty checkbox beside “Print background colors and images.”
4. Click the red circle at the top-left corner to save your changes and exit settings.
STEP 7: Printing Your Labels
Now, all you have to do is is load WorldLabel WL-350 labels into your printer and print using Word’s “Print” menu. Just choose the right printer, set the number of copies of your sheet to print, and click “Print.” In a moment, you’ll be peeling your newly designed labels off the sheet!
Written by Pariah Burke